Showing posts with label holiday. Show all posts

Simon Says Stamp DieCember 2025 release!


Hi Everyone! It's release time at Simon Says Stamp

Today I am sharing a card that I made using the new Simon Says Stamp Mountain Horizon die!


Thank you for stopping by today! 

 #simonsaysstamp
#cardmaking #papercrafting #cardmakers  #cardmakingsupplies #cardmaker #handmadecards #craftyfun 

To see the whole Simon Says Stamp Diecember  Release  CLICK HERE!


Simon Says Stamp Festive Fun Release!


Hi Everyone! It's release time at Simon Says Stamp

The Simon Says Stamp Festive Fun release is now available! 

Today I used the new Poinsettia Swag stamp Set!


Be sure to follow #SSSFestiveFun hashtag to see all of the awesome inspiration for all the new products in this release from all of the wonderful designers!  


 Happy Crafting!  


 #SSS #simonsaysstamp #SSSendACard  #SSSUnitedWeCraft #cardmaking #papercrafting #cardmakers #cardmakingsupplies #cardmaker #handmadecards

#craftyfun


Thank you for stopping by today!  

To see the whole Simon Says Stamp Festive Fun Release  CLICK HERE!


Simon Says Stamp Exclusive STAMPtember 2024 Blog Party!


Hi Everyone! I'm back today to join in the fun for The Simon Says Stamp STAMPtember 2024 Blog Party! 

Today I used the new Simon Says Stamp Big Holiday Words stamp set to create this card! 

If you have a look at the last image below you can redeem a coupon code for a FREE gift with purchase at Simon Says Stamp! There are many coupon codes available which you can find by looking at all of the Simon Designers! Happy Shopping! :)


 #sssSTAMPtember #SSSendACard #SSSUnitedWeCraft #Stamptember #SimonSaysStamp
 #cardmaking #papercrafting #cardmakers  #cardmakingsupplies #cardmaker #handmadecards #craftyfun 

To see the whole Simon Says Stamp STAMPtember release CLICK HERE!

See a short video on how I made this card: 

Here are links to the products used: 


Simon Says Stamp Exclusive STAMPtember 2024 Release!


Hi Everyone! The Simon Says Stamp STAMPtember 2024 release is live! Today I used the new Simon Says Stamp Big Holiday Words stamp set to create this card! 

First I  took out a Simon stencil from my stash and a card panel made and ink blended some ink on Neenah Solar white 110# cardstock. 


Then I stamped the Peace sentiment and trimmed down the panel slightly.  I added some gems and some gold splatter and then glued the panel to a card base made of 110# Neenah cardstock and that is it! 


 A quick and easy card to make! Thanks for taking a look at my blog today!  


Be sure to come back tomorrow for some more inspiration with this stamp set!


 #simonsaysstamp
 #sssSTAMPtember #SSSendACard #SSSUnitedWeCraft #Stamptember #SimonSaysStamp
 #cardmaking #papercrafting #cardmakers  #cardmakingsupplies #cardmaker #handmadecards #craftyfun 

To see the whole Simon Says Stamp STAMPtember release CLICK HERE!


Here are links to the products used:

Hero Arts Oh Joy 2023 Holiday Catalogue Release Blog Hop & GIVEAWAY!


Hi Everyone! Welcome to the Hero Arts Hero Arts Oh Joy 2023 Holiday Catalogue Release Blog Hop & Giveaway! 

You should have arrived here from my friend Erica's Blog!

Hero Arts be giving away two $50 gift cards, drawn from the comments left along the hop. Comment on all the blogs for more chances to win! You have until Thursday, August 31 at 11:59pm to enter. The winners will be announced on the Hero Arts blog.


I am so excited to share a card that I made with the new products from the Oh Joy 2023 Holiday Catalogue! 


For this first card I used the cut out trees from the panel I inked up to use with the Tree Pattern Cover plate! I inked up a panel of Neenah 110# paper with my Summer Sky ink and then adhered the trees to it. I popped up some of the trees with foam tape for some added dimension. I stamped the sentiment from the Holiday Season messages bundle and die cut it out and popped it up on the panel. I added some sequins and gems for some sparkle. I added the panel to an A2 side opening card base and that is it!


For this card I inked up a panel to die cut with the Tree Pattern Cover plate! Next I stamped the falala bold prints background stamp with some embossing ink and used some silver embossing powder and heat it until smooth!. I popped up the Tree Patten die cut panel over the falala panel and added some sequins some sparkle. I added the panel to an A2 side opening card base and that is it!


For this card i used the Merry Christmas letter bold prints background stamp and inked it up with some Crimson ink. I trimmed the panel and adhered it to an A2 side opening card base. I added a few jems and that is it! 

Thank you so much for stopping by today!

The next stop in the hop is the amazing Lounon!

Keep Hopping!

A Canadian Christmas Video Hop!


Hi Everyone! Today I am super excited to be taking part in a Canadian Christmas Video Hop sponsored by Scrap 'n Stamp!

Scrap 'n Stamp is giving away three $100 Scrap’n Stamp Gift certificates which will be chosen at random from the comments left on the videos in the hop! 

 The winners will be announced on the Scrap 'n Stamp blog on December 12.

Bonus:  You can save 20% on your purchase of regular priced items until December 8th 2022. Just enter the coupon code 20CChristmas at checkout! 

So let's get Hopping for some inspiration and then get Shopping at Scrap 'n Stamp! 
Start the hop here:


Simon Says Stamp Holiday Sparkle Release!


Hi Everyone! It's release time at Simon Says Stamp

Today I am sharing three cards that I made using the new Simon Says Stamp Printmaking Pines stamp set!

There are 4 easy layers to this stamp set and this is perfect for making multiples! Simply have your pre cut card panels ready and get stamping!

To make this really easy I used my Misti stamping tool. When you stamp then this makes getting a great impression the first time awesome! If you didn't get a great impression because you didn't press down on the entire image you can simply ink up and stamp again!

I  pulled out some ink colours from my Simon Says Stamp Pawsitively Saturated inks. First I used the Latte ink for the base of the trees image. Then I inked up each of the other three layers using the inks from lightest to darkest.


Next I took 3 card bases made with 110# Neenah paper and swiped the medium ink pad colour directly to the front to make a coordinated base. Then I took my quickie glue pen and traced the perimeter of the card panel and then poured some chunky glitter on it. I added a few gems and that is it!

Thank you for stopping by today! 


 #simonsaysstamp
#cardmaking #papercrafting #cardmakers  #cardmakingsupplies #cardmaker #handmadecards #craftyfun 

To see the whole Simon Says Stamp Holiday Sparkle  Release  CLICK HERE!

Simon Says Stamp Glistening Snowflakes!


Hi Everyone! Have you seen the Glistening Snowflakes stamp set from Simon Says Stamp Cozy Hugs release? It is super pretty with lots of Winter and Holiday card options! 


Happy Crafting!  


#SimonSaysStamp #SSSCozyHugs #SSSendACard  #SSSUnitedWeCraft #cardmaking #papercrafting #cardmakers #cardmakingsupplies #cardmaker #handmadecards

#craftyfun


To see the whole Simon Says Stamp Cozy Hugs  Release  CLICK HERE!


Three Room Studio Christmas Card Parade!

Hi Everyone! Welcome to the Three Room Studio Christmas Card Parade!  The design team is showcasing holiday cards for this celebration! 

For my card today I used my Copic markers to colour the lady sitting in the chair from the Let's Hygge stamp set. I used some paper from my stash paper to piece the chair and ottoman and added some Copic markers to give the chair some depth. I also used paper from my stash to create the wall and the wood flooring.  


Next I  coloured the fireplace from the Witch's Parlour digital stamp set with my Copic markers and fussy cut it out. I used my Distress Oxide inks in Spiced Marmalade and Squeezed Lemon to create the glow in the fireplace. I paper pieced the carpet from the Witch's Parlour with some paper in my stash. 


For the Christmas Tree I used the Evergreen tree from the Welcome Winter stamp set. I stamped the tree four times and adhered them together to get the look that I wanted. Then I coloured it with my Copic markers and added some red and green stickles for decoration. I added a star to the top of the tree from the Welcome Little One stamp set and cut it out of some glitter card stock. I also added a tree stand that I cut with the same glitter card stock. The sentiment is also a digital stamp that I cut out and popped up on the card. 

That's it! Thank you for stopping by! 


Three Room Studio: Saturday Challenge Bold and Bright


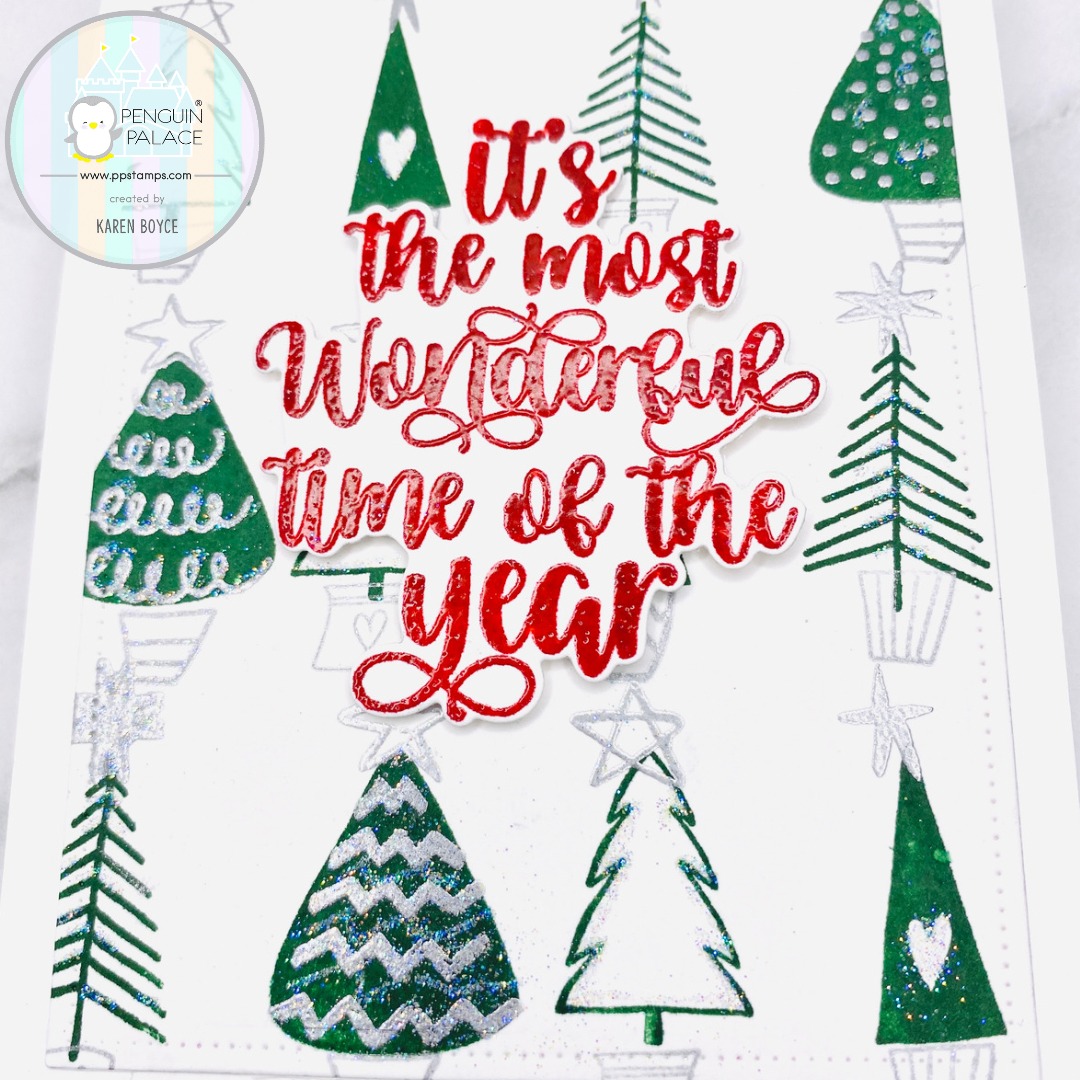
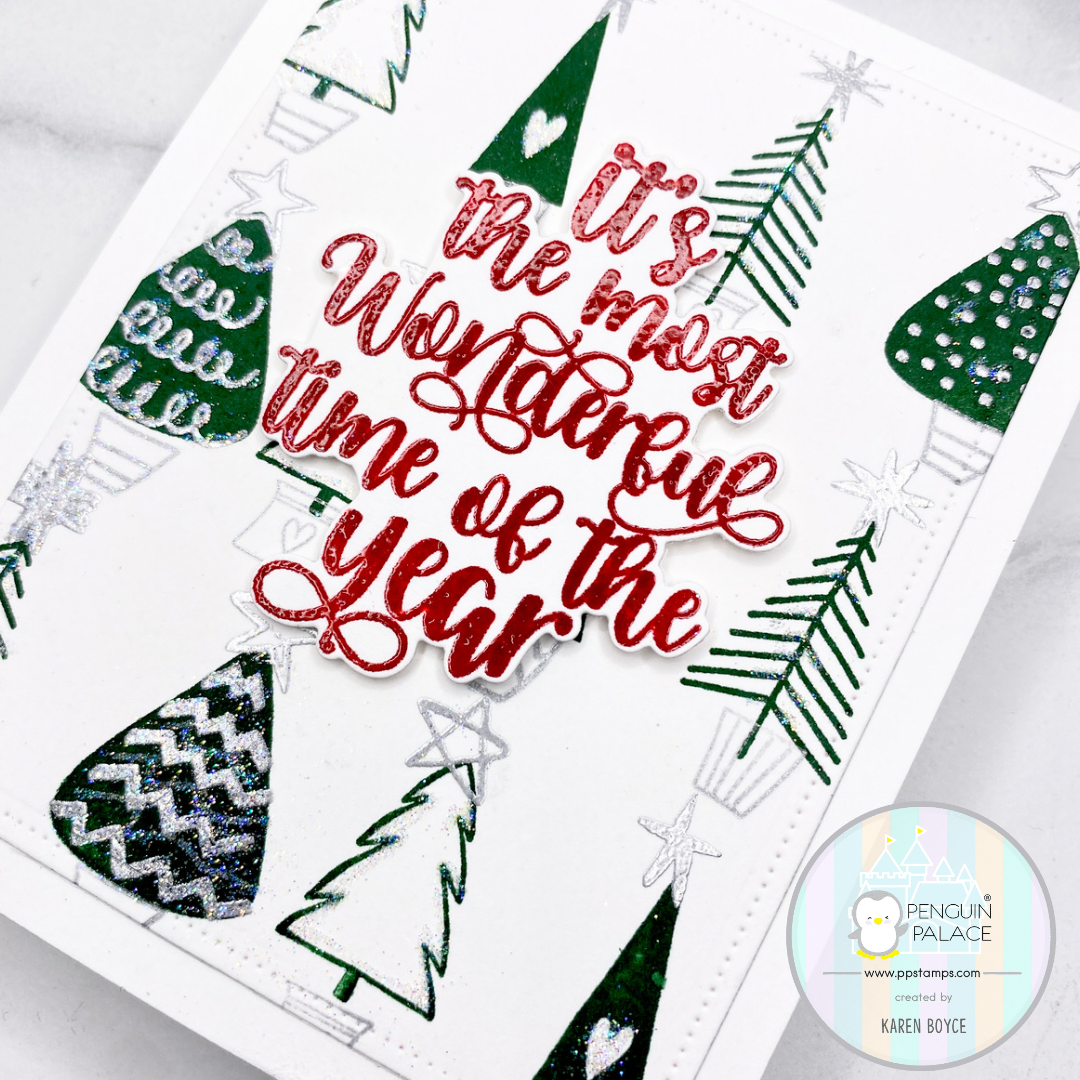
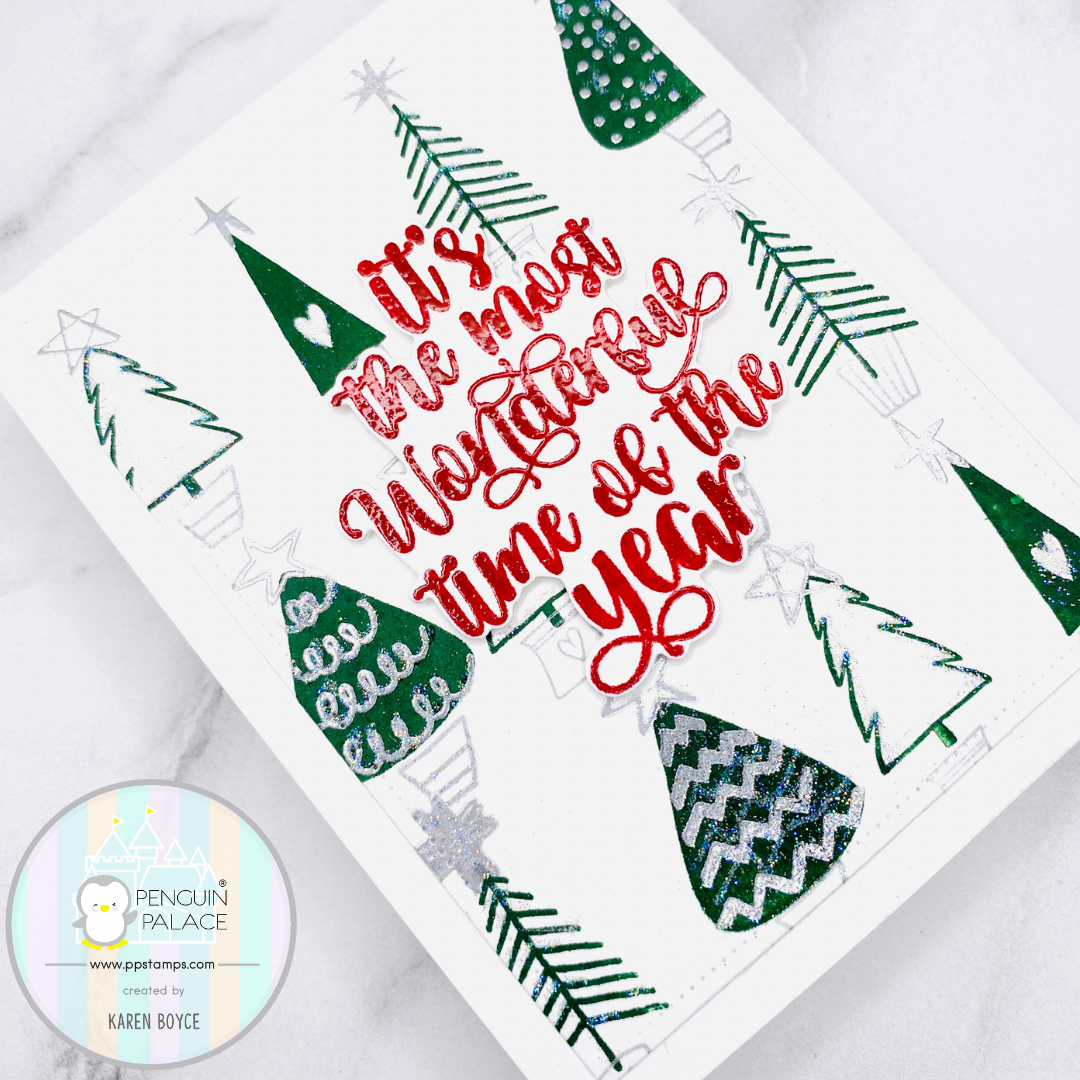
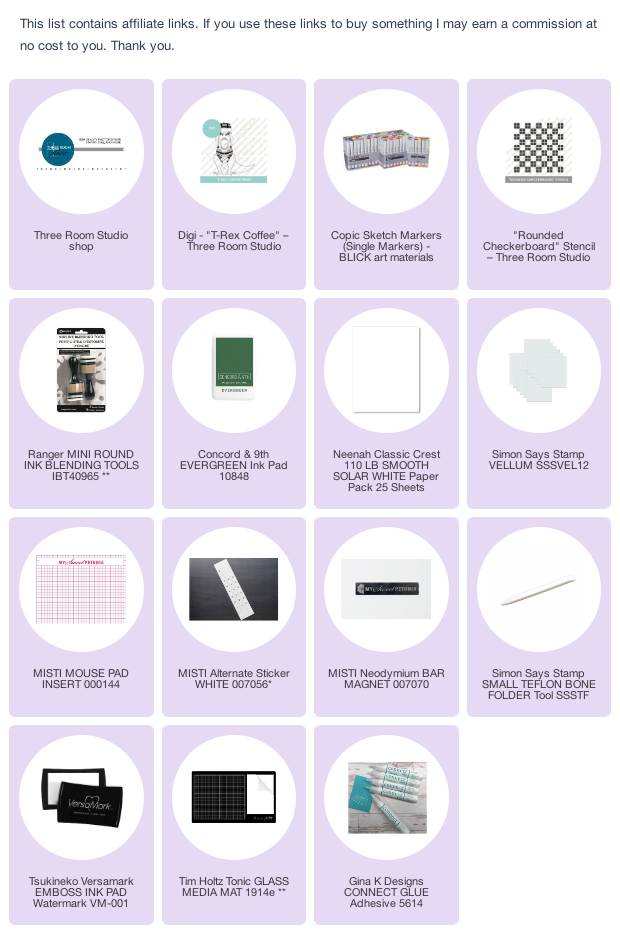
Hi Everyone!  It's time for the Three Room Studio Saturday Challenge! The theme today is bold and bright!  For the challenge today I used the T Rex Coffee digital stamp and the Rounded Rectangles Stencil! 


First I printed out the T Rex Coffee digital stamp with my printer on some Neenah 80# cardstock. I coloured him up and set him aside. Then I got a piece of Bristol paper and ink blended  the stencil with some green ink. Next I took a gold pen from my stash and made bows on each of the rectangles to make then look like presents. I die cut that panel with a die that is a little smaller than A2 and adhered it to my card base of Neenah 110# paper. 

Finally I added the T Rex image to the panel and popped him up with some foam tape. I added some puffy embossing powder to his hat and the snow at his feet. I also added some glitter around the panel and on the snow. That is it! 


Be sure to check out some of our fellow designers for today's challenge: 


@inkyfingersandribbon

@creatingwithsusan

@kerri1974mar

@i_card_so_hard

@stamping_imperfection


 To join in and share your own card for the challenge check out the full challenge details on the @threeroomstudio blog!  One lucky participant per month will win a $15 gift certificate to the Three Room Studio Shop!! Get crafting! 

Here is a link to the Three Room Studio Blog:

https://www.threeroomstudio.com/blogs/news

#threeroomstudio #threeroomstudiojustamoment #threeroomstudiostarrayfull #copicmarkers #threeroomstudiosaturdaychallenge 

#adultcoloring #adultcolouring #cardmaking #papercrafting #cardmakers #cardmakingsupplies #cardmaker #handmadecards #craftyfun 


It's the most wonderful time of the year!


Hi Everyone! Today I am excited to be joining the Penguin Palace design team just in time to share the new Fall/ Winter release! Here is a card that I made using the new Penguin Palace Minimalist Christmas Trees stamps and the Magical Christmas stamps and dies.


First I arranged the tree stamps that I wanted to include on this card. Then I used some green ink and repositioned the paper to arrange the trees on the subsequent rows. Then I added the stamps that add designs to the trees using some Versamark ink and used some silver embossing powder and heated it until smooth. I repeated the steps with the stars and then used silver ink to stamp the pots.  


Next I stamped my sentiment with red ink and added some clear embossing powder to make the sentiment shine. I cut the sentiment out using the coordinating die.


I added some fine glitter by using my quickie glue pen and that is it!
Thank you for stopping by my blog today!

To get your own stamps and dies from this new collection you can preorder them now!

Happy Crafting!